Puppet with Tensorflow.js and PoseNet
Contents
Make things
Let’s make a puppet using PoseNet and two servo motors. The puppet can change the posture up and down and left and right.

Materials
- obniz Board
- power supply for obniz
- Servo Motor x2
- PC or smartphone (PoseNet can be used)
- powerful double-stick tape
- puppet
- mechanism to fix the puppet to the servo motors(a stick, an L shaped brackets, etc.)
- foundation and weight
How to make
Body
Fix two Servo Motors in such a direction as the image below. The lower Servo Morter is for the yaw(z) axis and the upper Servo Motor is for the pitch(y) axis.
They need to be fixed tightly because the strong force from puppet inertia will be applied at the point of contacting them between them when they move quickly.
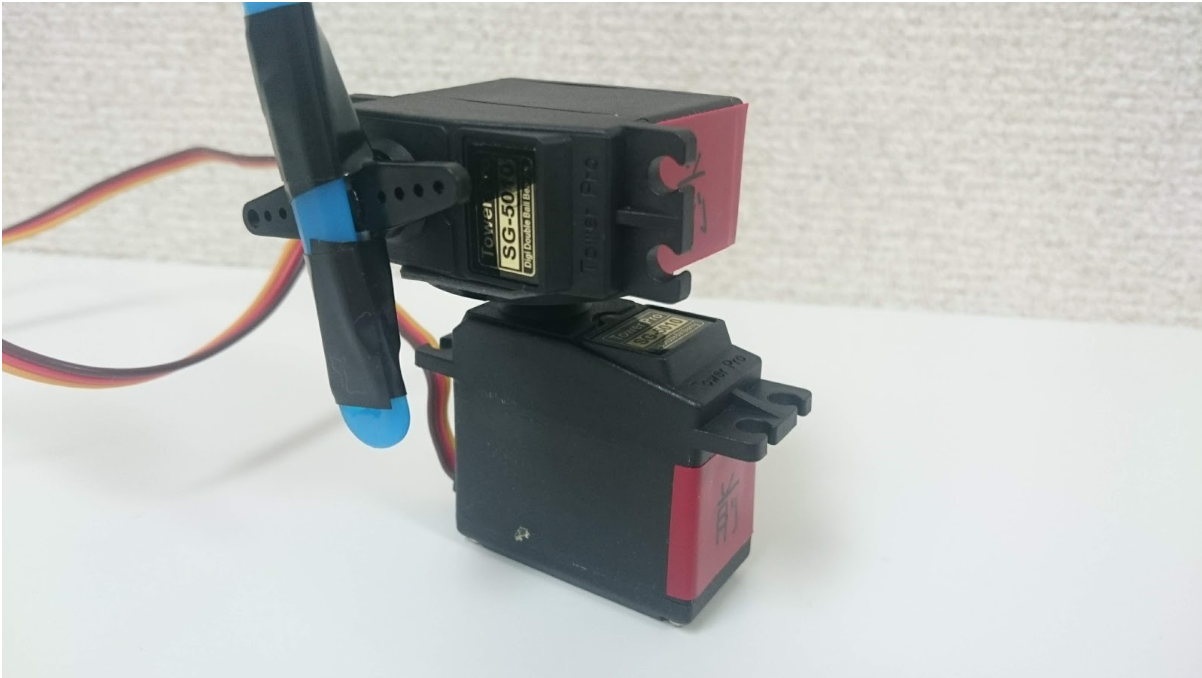
Then, put the stick to the upper Servo Motor (the blue one in the image above), and cover it with the puppet. Be careful not to idle.
Hardware connection
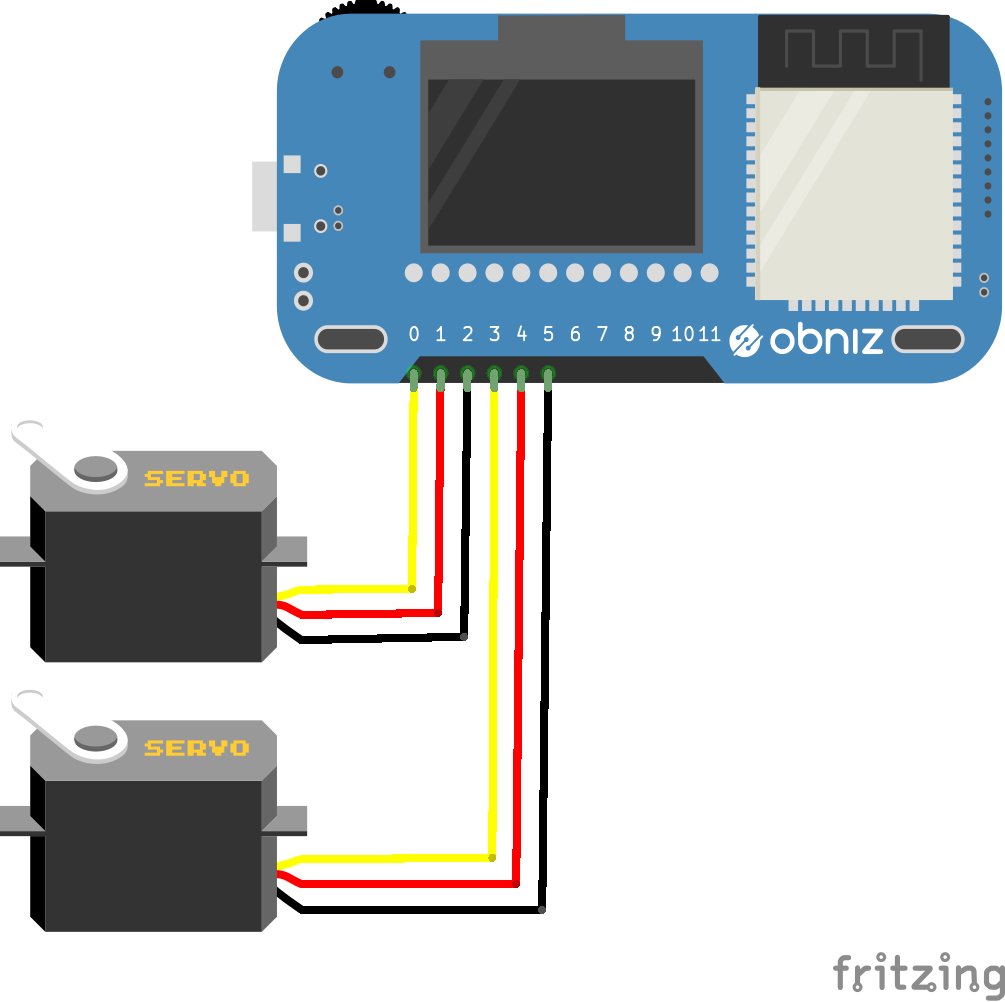
Connect Servo Motors to an obniz Board like the table and the image below by referring to Servo Motor Library. Of the two servo motors, one is for the yaw(z)axis, the other is for the pitch(y) axis.
| obniz | Servo Motors |
|---|---|
| 0 | [for yaw axis] signal |
| 1 | [for yaw axis] Vcc |
| 2 | [for yaw axis] GND |
| 3 | [for pitch axis] signal |
| 4 | [for pitch axis] Vcc |
| 5 | [for pitch axis] GND |
Software
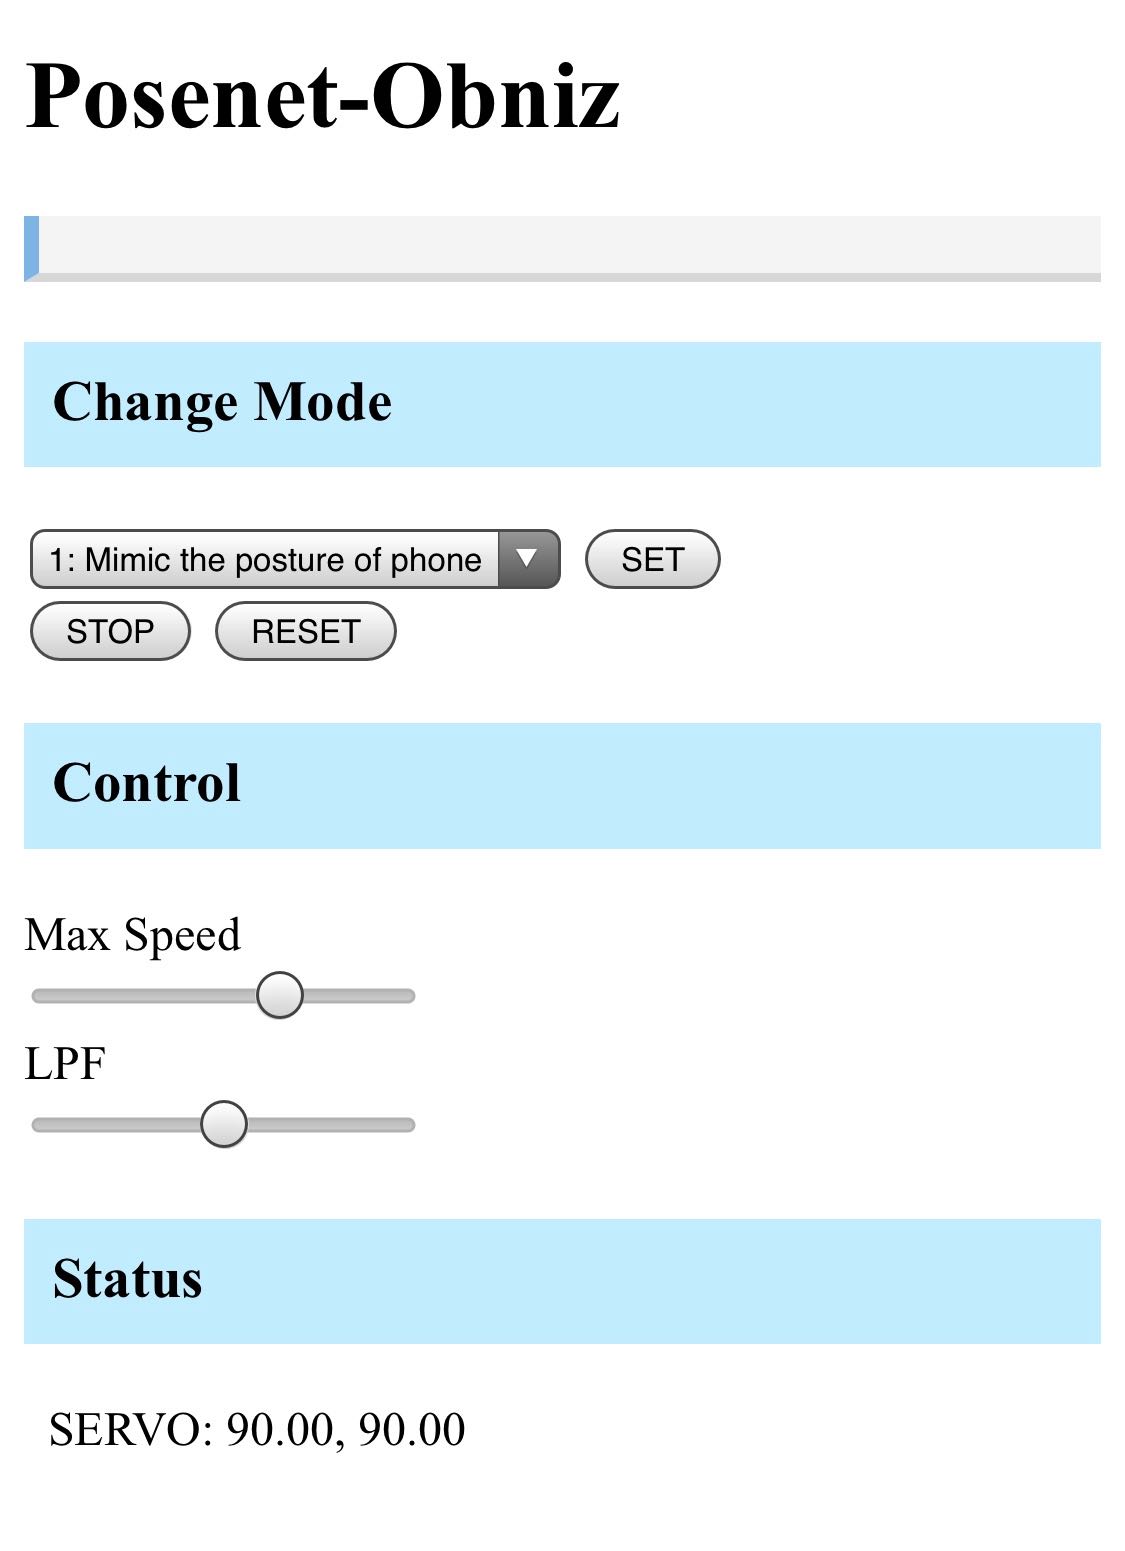
In this program, you can switch three modes.
- mode1: turn to a smartphone orientation (used inertial sensor in a smartphone)
- mode2: mimic your head posture (used Web camera and PoseNet)
- mode3: turn to human presence (used Web camera and PoseNet)
PoseNet is a machine learning model that can estimate the human pose in realtime with a web browser using TensorFlow.js which is a JavaScript version of Google’s machine learning library TensorFlow.
It is recommended to refer to the “Program” below.
Mode selection
Elements whose classes are specified as “view-contents-mode1“, “view-contents-mode2” and “view-contents-mode3” are displayed only in each mode. You can select the mode from 1 to 3 with the select element. Pressing the SET button toggles the display according to the value of the mode selected at that time and executes bindPage() when using PoseNet and start posture estimation.
Getting inertial sensor values
In mode 1, the inertial sensor value of the device is used.$(Document).ready is executed when loading of HTML has completed, and here,
if (window.DeviceOrientationEvent) {
            window.addEventListener ('deviceorientation', function (eventData) {
every time the pose of the device is obtained, yaw and pitch are calculated from eventData, and it is made to be able to refer at any time as smp.yaw and smp.pitch. The value is adjusted using the constrain function because the servo motor rotates from 0 to 180 degrees.
Pose estimation with PoseNet
In mode 2 and 3, the pose estimation by Web camera and PoseNet are used. We referenced this website. http://developers.gnavi.co.jp/entry/posenet/hasegawa
Setting up of PoseNet and web camera are done in bindPage(); and start pose estimation with detectPoseInRealTime(video, net); . net.estimateSinglePose(video, imageScaleFactor, flipHorizontal, outputStride); is actually the part where the pose is estimated.
In drawPoints(poses, ctx); , we get the coordinates of the parts, such as eyes and nose from the pose estimation results, and in the canvas, points and their part names are drawn at the place of each part.
Besides, for mode 2, the yaw and pitch values of the orientation of your face are simply calculated by trigonometric functions, and these values are stored in the object “mypose.” For mode 3, the yaw and pitch values the puppet should face are calculated simply from the position of the nose in the screen, and these values are stored in the object “myposition.”
Driving of the servo motors
The angles of servo motors are updated by using the setInterval function in the startServo function.
When you start the respective modes, Mode 1 … startServo (smp, 50) Mode 2 … startServo (mypose, 100); Mode 3 … startServo (myposition, 100) is executed, for example in mode 1, concerning the variable “smp“, updateServo function which is to update the angle of the servo motor by the values of yaw and pitch of “smp” will be called every 50 ms.
The angle of the servo motor is calculated and updated in this function: moveServoToward (src.yaw, src.pitch, max_deg, min_deg); . In this function, a simple low-pass filter is implemented as a program to smooth the motion of the servo motor. lpf_a is the coefficient of the low-pass filter, and s_yaw and s_pitch are the values of yaw and pitch of the servo motor before updating. A function that updates the servo motors’ angle directly is in setServo, and at the same time, that angles are assigned to s_yaw and s_pitch.
Program
How to use
Operation confirmation
Since the Smartphone’s inertial sensor is used in mode 1, and web camera and PoseNet are used in mode 2 or 3, this program may not work depending on the device. (It is not necessary to connect to obniz if you want to do only the operation confirmation below.)
Operation confirmation of the inertial sensor
Execute the program, select mode 1 and press the SET button, then yaw, pitch, and roll values are displayed on the line labeled “RAW:” in the “Status” view at the bottom of the screen. When keeping the Smartphone horizontally and rotating it like a compass needle on the horizontal plane, if the leftmost value (yaw) changes between 0 and 360 degrees, it works properly. We confirmed the operation with these environments.
- Xperia Z3 (Android 6.0) + Chrome
- AQUOS PHONE (Android 8.0) + Chrome
Operation confirmation of PoseNet
Execute the program (HTTPS connection required), select mode 2 or 3, and wait a while. If the image of the camera appears and the position of eyes and nose are recognized, it is working properly. We confirmed the operation with these environments.
- iPhone X + Safari
- AQUOS PHONE (Android 8.0) + Chrome
- MacBook Pro 2017 + Chrome
In the case of Smartphones, in a low-speed mode of about 1 fps in the mode using the camera, but in MacBook Pro, it got about 10 fps.
Operating Method
When you have completed operation confirmation, let’s run the program below!
When obniz is connected, select the mode and press the SET button to start the operation. In Mode 1, the operation does not start until the START button is pressed to align the orientation of the Smartphone with the puppet. The STOP button stops the servo motors as it is. The RESET button returns the servo motors to the initial position and stops servo motors.
Also, to prevent the servo motors from moving rough, Max Speed and LPF can be adjusted with bars. LPF is the coefficient of the low pass filter. The filter on the right is stronger and stops at the far right. The smaller the Max Speed and the larger the LPF, the servo motors move gently, but the slower the reaction. If it is reversed, the reaction is early, but it gets rough.